Showing posts with label Thanksgiving. Show all posts
Thursday, July 8, 2010
Thanksgiving Turkey
Hello!
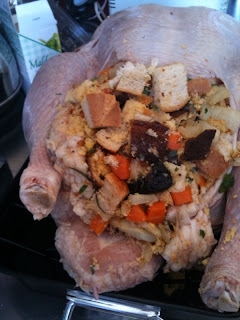
Ain't it a beauty?
This is the turkey that graced the table at my 4th annual Thanksgiving Dinner. All 9kg of it.
It started because I had an American flatmate, who didn't cook much (and was vego), and because I love an excuse to cook a MASSIVE feast for friends!
Having persevered for the last 3 years with the traditional date (the last weekend of November), memories of last year's near heat stroke conditions were enough to prompt a change to June. Definitely an excellent move! this year's dinner was by far the best one thus far.
Unfortunately my spacial awareness continues to be, ummm, limited, so it was quite a cosy affair fitting 25 people in to my living room & then feeding them 3 courses!
The menu this year was:
Entree: Butternut Pumpkin & Vanilla Soup
Main: Maple Roast Turkey w/ Cornbread Sourdough Stuffing
Sides: Roast Parsnips & Dutch Carrots, Mashed Potato, Green Beans
Dessert: Peanut Butter Pie, Triple-Choc Pumpkin Pie, Apple Pie, Mixed Berry, Cherry & Almond Pie
Ice-Creams: Ginger Ice-Cream, Vanilla Ice-cream, Chocolate Ice-cream, and Praline Ice-cream.
All made from scratch. Yes, really.
Why?
Because I am a crazy foodie lady!
Maple Roast Turkey w/ Sourdough & Cornbread Stuffing
1 turkey (mine was 9kg, and it fed 25 people, but then they may have held back extra space for dessert)
Cornbread Sourdough Stuffing
6 tbs unsalted butter
1 tbs freshly grated ginger
1/4 cup pure maple syrup
Place an oven rack in the lowest third of the oven, and preheat the to 220'c. Wash the turkey inside & out w/ cold running water, and pat dry w/ paper towels. Generously season the neck, body & cavities, and the underside too. Tuck the wing tips under the body.
Loosely fill the neck cavity with the stuffing. Use wooden skewers or toothpicks to secure the flap. My attempt at this was crude, to say the least, so don't stress about it too much.
Holding the turkey upright, fill the cavity w/ the stuffing. The recipe says loosely, but I really did stuff that thing! Pull the legs together, and tie w/ kitchen twine. Heap on additional stuffing so that it is bulging out of the cavity (a la the picture up top). Generously sprinkle more salt & pepper over the bird, and set in a roasting pan (ideally, put a roasting rack inside the pan, and the turkey on the rack).
The recipe then says to take 4tbs of butter, melt it, and soak a large piece of muslin (large enough to cover the top of the turkey when folded in half), in the butter, before "draping" over the turkey.
I don't tend to keep muslin on hand. Call me strange. So what I did instead was took the butter, and rubbed it all over the outside of the turkey, and then lifted the skin away, and placed knobs of butter between the skin & the meat (the same as I did for the roast chicken). I then put a piece of baking paper over the top of the turkey.
Put the big bird into the oven, and roast for 30 minutes, then baste w/ the juices (hell, its mostly butter!) that have formed in the bottom of the pan. Reduce the heat to 180'c, loosely cover the whole bird in alfoil (I removed the baking paper at this point). Roast for a further 30 minutes before basting again. Continue roasting, basting once an hour until juices run clear.
During the final half hour of roasting, place grated ginger in a small saucepan, and add the maple syrup & butter. Heat until melted & bubbling, then remove from the heat. Remove (& discard) the alfoil tent, and brush the maple mix (I just used the baster) over the bird.
For my 9kg bird, I gave it about 4 hours or so. You could also use a meat thermometer to test the 'done-ness' (85'C for the leg, 75'C for the breast).
This turkey truly turned out better than I could have hoped.
I think one of the reasons why it turned out so well was I rested the bird for what turned out to be well over an hour (with an alfoil tent back over it). The length of time wasn't intentional, its just time got away from us. The longer any piece of meat rests, the more it has time to settle, and the moisture that remains has a chance to evenly distribute itself throughout whatever it is you've just pulled from the oven. In this case the result was just fantastic.
Cornbread & Sourdough Stuffing
This stuffing is very easy to make, and is absolutely delicious! I'm not sure if I just cut the cornbread & sourdough a bit too large, but this yielded a very large amount of stuffing. I stuffed my 9kg turkey, and had some to spare!
I am not sure if you can buy ready made cornbread, so I just made my own (yes, yes, I've heard it all before! :) You can find the recipe for the cornbread here.
Cornbread & Sourdough Stuffing
6 tablespoons unsalted butter
1 medium onion, in 1/4" dice
2 cloves garlic, minced
2 carrots, peeled, 1/4" dice
1/2 bulb fennel, 1/2" dice
Cornbread, cut into 1/2" cubes (isn't a dice a cube?)
10 ounces of 1 day old sourdough, cut into 1/2" cubes
3 tbs assorted herbs (rosemary, sage, thyme, parsley, marjoram etc. I wouldn't use basil)
1 cup pitted prunes, 1/2" dice
5 dried pears, 1/2" dice (you could use apricots instead)
salt + pepper
1/2 cup turkey stock (I used chicken stock)
1) Melt 2 tbsp of the butter in a large pan over med-low heat. Make sure it is a LARGE pan. Or even a saucepan if you've only small pans. Add the onions, garlic, carrots & fennel & cook until the vegetables are tender (not soggy!), around 10-15 mins. Remove from the heat.
2) In a large bowl, mix the cornbread & sourdough together, then add the vegetables, herbs, prunes & pears. Mix together well, and season.
3) Melt the remaining 4 tablespoons of butter & add to the stock, then pour the lot of the stuffing mixture. Toss to combine, and allow to cool. Cover & refrigerate until the turkey (or whatever you are using this for) is ready to be stuffed.
4) Remember, stuff your turkey just prior to putting it in the oven. If you stuff the turkey, and allow it to sit, bacteria could develop.
Skillet Cornbread!
I just love cornbread. I know it is Not My Friend (the carbs! the carbs!), but who am I kidding - I make my own ice-cream!
This is the only recipe I have ever used to make it, and it always turns out very well, and is very quick to make. If you whip up a batch of this, and pop it into the oven, then get cooking on your meat & capsicum, you will have a fantastic Mexican meal ready to roll in around half an hour! How Good Is That!
FYI - corn 'flour' and corn 'meal are confusing terms. Cornflour as sold in the supermarkets is a thickening agent. If you make cornbread with this stuff it would quite possible be the most revolting thing you have ever eaten.
What they mean in the recipe below is what is often called 'Miaze Flower' here. You can find it in healthfood stores, and it has a lovely yellow colour to it.
This is the brand I used. I have no association with the company, and I only use this brand because it is what my local healthfood shop stocks. But I thought a link might be helpful, so here it is: http://www.organicsaustraliaonline.com.au/prod415.htm
Finally, this is called 'Skillet Cornbread'. I just cook it in a solid based (i.e. not springform) pie tin. By melting the butter per the instructions, the cornbread turns out of the pan perfectly.
Skillet Cornbread
1.25 cups yellow cornmeal (see above re: cornflour)
1.25 cups plain flour
2 tbs sugar
1.5 tsp baking powder
0.5 tsp baking soda
1.25 tsp coarse salt
1 large egg
1.75 cups buttermilk (or same quantity of full cream w/ a squeeze of lemon juice)
4tbs unsalted butter
I apologise for the tablespoon butter measurement. This is an American thing and for the life of me I can't see how it is easy to measure something like butter in tablespoons! Give us a weight Martha!!
I just kind of roughly figure it out, lopping tablespoons out of room temp block of butter.
1) Preheat the oven to 220'c. Whisk together the cornmeal, flour, sugar, baking powder, baking soda, and salt in a large bowl & set aside. Whisk together the egg & buttermilk, then stir into the flour mixture.
2) Melt the butter (!!) in a 10-inch skillet or baking dish in the oven. remove the skillet, and swirl the butter all over to coat the bottom & sides. Pour in the batter, and bake until a tester comes out clean, around 20 - 25 minutes. Cut into wedges & serve.
This is the only recipe I have ever used to make it, and it always turns out very well, and is very quick to make. If you whip up a batch of this, and pop it into the oven, then get cooking on your meat & capsicum, you will have a fantastic Mexican meal ready to roll in around half an hour! How Good Is That!
FYI - corn 'flour' and corn 'meal are confusing terms. Cornflour as sold in the supermarkets is a thickening agent. If you make cornbread with this stuff it would quite possible be the most revolting thing you have ever eaten.
What they mean in the recipe below is what is often called 'Miaze Flower' here. You can find it in healthfood stores, and it has a lovely yellow colour to it.
This is the brand I used. I have no association with the company, and I only use this brand because it is what my local healthfood shop stocks. But I thought a link might be helpful, so here it is: http://www.organicsaustraliaonline.com.au/prod415.htm
Finally, this is called 'Skillet Cornbread'. I just cook it in a solid based (i.e. not springform) pie tin. By melting the butter per the instructions, the cornbread turns out of the pan perfectly.
Skillet Cornbread
1.25 cups yellow cornmeal (see above re: cornflour)
1.25 cups plain flour
2 tbs sugar
1.5 tsp baking powder
0.5 tsp baking soda
1.25 tsp coarse salt
1 large egg
1.75 cups buttermilk (or same quantity of full cream w/ a squeeze of lemon juice)
4tbs unsalted butter
I apologise for the tablespoon butter measurement. This is an American thing and for the life of me I can't see how it is easy to measure something like butter in tablespoons! Give us a weight Martha!!
I just kind of roughly figure it out, lopping tablespoons out of room temp block of butter.
1) Preheat the oven to 220'c. Whisk together the cornmeal, flour, sugar, baking powder, baking soda, and salt in a large bowl & set aside. Whisk together the egg & buttermilk, then stir into the flour mixture.
2) Melt the butter (!!) in a 10-inch skillet or baking dish in the oven. remove the skillet, and swirl the butter all over to coat the bottom & sides. Pour in the batter, and bake until a tester comes out clean, around 20 - 25 minutes. Cut into wedges & serve.
Subscribe to:
Posts (Atom)